How Obsidian Webhooks Works
Architecture, setup, integration examples — all on one page
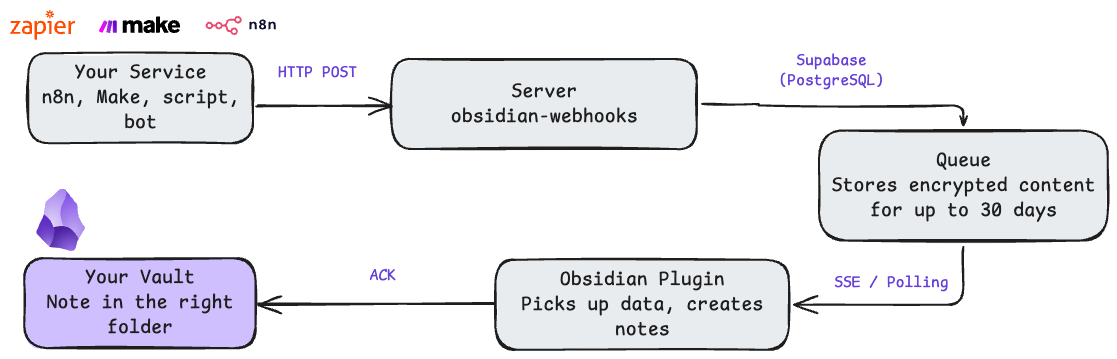
Architecture
"Vault" is a note storage in Obsidian. A folder on your disk where all .md files live.
1. Your Service — n8n, Make, script, or bot sends an HTTP POST with content
2. Server — validates the webhook_key and saves content to the queue
3. Queue — stores data for up to 30 days, even when Obsidian is closed
4. Obsidian Plugin — online: content arrives via SSE in 1-3 seconds. Was offline: picks up everything on reconnect
5. Your Vault — plugin creates a note and sends delivery confirmation (ACK). Server clears the queue
Quick Start
From signup to your first note in vault — 5 minutes. See also: Self-Hosted Setup Guide
Sign up
Check your email → click the login link → open your dashboard. You'll see two keys:
- •
webhook_key— for sending content to the server - •
client_key— for connecting the plugin in Obsidian
Install the plugin in Obsidian
1. Download: Download Plugin →
2. Extract to your vault:
.obsidian/plugins/obsidian-webhooks/
├── main.js
└── manifest.json
3. Obsidian → Settings → Community plugins → "Obsidian Webhooks" → Enable
4. Settings → Obsidian Webhooks → paste your client_key → Connect. ● = connected
Send your first webhook
Quickest way to check it works — curl:
curl -X POST \
  "https://obsidian-webhooks.khabaroff.studio/webhook/{your_webhook_key}?path=inbox/test.md" \
  -H "Content-Type: application/json" \
  -d '{"content": "# First note\n\nSent via webhook!"}'
A note will appear in your vault within 1-3 seconds at inbox/test.md. For more examples, see 10 Automation Recipes.
Server response:
200 OK — content accepted and queued
400 Bad Request — missing path query parameter
401 Unauthorized — invalid webhook_key
Two Keys for Sending and Receiving
webhook_key
For sending content to the server.
POST https://obsidian-webhooks.khabaroff.studio/webhook/{webhook_key}?path=inbox/note.md
Content-Type: application/json

{
  "title": "My Note",
  "content": "# Title\n\nNote text",
  "tags": ["inbox", "webhook"]
}
path — where to save in vault (required, query param)
content — note body in Markdown
title, tags, date, ... — go to YAML frontmatter
Plain text body is written as-is, without JSON parsing.
client_key
Paste into Obsidian: Settings → Obsidian Webhooks → Client Key.
Each webhook_key is paired with a client_key. Content sent to one is only accessible to its pair.
Keys are generated cryptographically — impossible to guess.
Integration Examples
Works with any service that supports HTTP POST. See 10 ready-to-use recipes for Zapier, Make, n8n, and more.
n8n
1. New Workflow → "HTTP Request" node
2. Method: POST
3. URL: https://obsidian-webhooks.khabaroff.studio/webhook/{webhook_key}?path=inbox/n8n-note.md
{
  "content": "# Note from n8n\n\nWorkflow data",
  "source": "n8n"
}
Make
1. New Scenario → "HTTP" module → "Make a request"
2. Method: POST
3. URL: https://obsidian-webhooks.khabaroff.studio/webhook/{webhook_key}?path=inbox/make-note.md
{
  "content": "# From Make\n\nText",
  "source": "make"
}
Python
import requests

response = requests.post(
    "https://obsidian-webhooks.khabaroff.studio/webhook/{webhook_key}?path=inbox/script-note.md",
    json={
        "content": "# Note from Python\n\nText",
        "source": "python"
    }
)
print(response.status_code)  # 200
Telegram Bot
Telegram doesn't send webhooks to arbitrary URLs. You need a bot — a simple script that forwards messages as HTTP POST.
WEBHOOK_URL = "https://obsidian-webhooks.khabaroff.studio/webhook/{webhook_key}"

def handle_message(update, context):
    text = update.message.text
    requests.post(
        f"{WEBHOOK_URL}?path=inbox/telegram.md",
        json={"content": f"# Telegram\n\n{text}"}
    )
Token: Telegram → @BotFather → /newbot
cURL
curl -X POST \
  "https://obsidian-webhooks.khabaroff.studio/webhook/{webhook_key}?path=inbox/test.md" \
  -H "Content-Type: application/json" \
  -d '{"content": "# Test\n\nIt works!"}'
Dashboard
Keys, stats, request format
Keys and stats
Your webhook_key and client_key with Show/Hide and Copy. Stats: key status, creation date, last used, event count.
Quick start and request format
Step-by-step setup guide, plugin download link, curl example, and a full table of JSON body fields (content, title, tags, ...).
Frequently Asked Questions
The server uses Server-Sent Events (SSE) to push data to the Obsidian plugin the moment it arrives. SSE keeps a persistent connection open between the plugin and the server, so new webhooks are delivered within 1-3 seconds.
The server stores webhooks in an encrypted PostgreSQL queue for up to 30 days. When you reopen Obsidian and the plugin reconnects, all queued webhooks are delivered automatically. No data is lost.
After the plugin writes a note to your vault, it sends an acknowledgment (ACK) back to the server. The server only removes the webhook from the queue after receiving the ACK. This exactly-once delivery guarantee ensures no duplicates or lost messages.
Yes. All webhook payloads stored in the queue are encrypted at rest with AES-256-GCM. The connection between the plugin and the server uses HTTPS (TLS 1.3). No payload data appears in logs or metrics.
Yes. Each vault gets its own webhook_key and client_key pair. Content sent to one key is only accessible to its paired key. One server supports multiple vaults with complete isolation between them.
Other Guides
How to Receive External Data in Obsidian
Complete guide to sending data to Obsidian from external services using webhooks.
12 min readSelf-Hosted Obsidian Webhooks: Setup Guide
Step-by-step tutorial for setting up your own webhook server with Docker.
18 min read10 Automation Recipes
Copy-paste webhook recipes for Zapier, Make, n8n, IFTTT with JSON payloads.
11 min readConnect AI Agents to Obsidian
Integrate Claude, GPT, and custom agents with your knowledge base via webhooks.
14 min readREST API vs Webhooks
Comparison guide: when to use Local REST API plugin vs Webhooks Server.
12 min readInstall Obsidian Webhooks
Download the latest release of the plugin and server.
Download →